In a previous post I looked at training a Tensorflow object detector using a custom dataset. It requires bundling up the image and object data into a binary format called a record file.
Many errors can appear at this stage; once you've got your binary record file; how do you check it? Can you plot its contents to make sure there are no bounding boxes outside the image areas? is your encoding correct? Hopefully this demonstration will clear up these potential errors and make using record files less opaque.
This post is based around some GitHub code which includes some example images and a Jupyter notebook to read and write record files.
I will now go through each of the useful functions, which are given as examples in the Jupyter notebook
1 : Create the Label File
The first useful thing in this code is the automation of the creation of the label file required by the object detectors (the .pbtxt file). In my project structures, I always have an images folder full of jpgs, and a single text file which lists all the ground truth bounding boxes for the images. An example is provided with the code;
labels.txt
If this label files exists we can easily automate the creation of the label file in the format Tensorflow asks for, since all the classes are already in the label file. Just use the function
2 : Writing Record Files
To use the Tensorflow object detection API requires the data to be prepared into the TFRecord format (usually via a .record file). Using this format is also sensible because it is part of the Tensorflow pipeline and so comes with a lot of optimizations; particularly when using a GPU to train a neural network. In that case; you want to do all the file loading using the CPU, leaving the GPU to handle the computations of the data through the network.
I have covered the process of creating a record file in a previous post, as well as share some code on GitHub. In this post; the code has been moved into the record_io.py file; with the Jupyter notebook calling functions from the file.
To write the record file, we call the following function
This requires several inputs. The image path is the location of the image files; and the output path is the full path to the record file; so for example
The class_to_index dictionary maps the name of the object classes into integers; for example;
This dictionary is created for you in the Jupyter notebook using the label file that you have already written. The second dictionary examples_dict contains all the data to be written into the record file. This dictionary has the image filenames as keys; and as values it has a dictionary with two entries; "box_coords" and "class" which are lists of the bounding box coordinates and the names of the classes to which that bounding box belongs. Here is a quick example of a valid examples_dict
The create_record_file function will iterate through the list of files in this dictionary; and create an "Example" object for each one, saving them to the .record file. I won't go through the code in detail
If you run the Jupyter notebook up to this point you should have created two record file; although I have provided some precomputed ones with the code just in case you want to skip to the reading/diagnostic part.
3. Reading Record Files
It is good to have a reader as well as a writer to check any record files. Since they are binary the reader is not absolutely trivial. The reader function can be found in record_io.py;
There are a couple of options ;
If you want to read all the data out of the file in order to use if for something else; the return_dict will cause the function to return a dictionary containing all the images as numpy arrays; as well as bounding boxes and other meta information
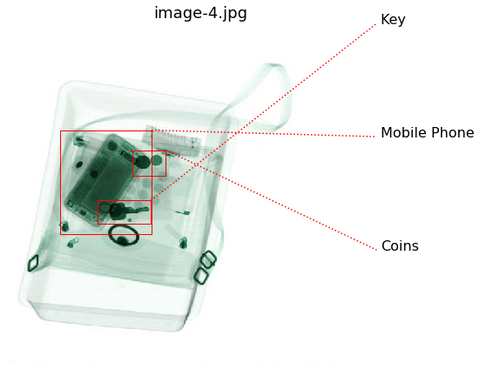
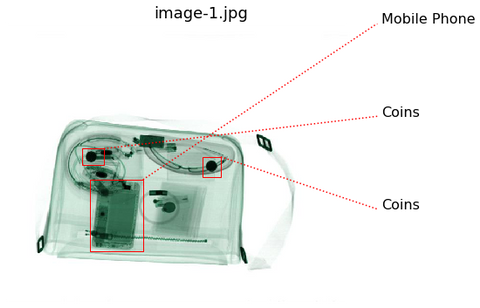
If you just want to look at the images to check if they display ok and the bounding boxes are in the correct place then set the plot argument to True.
The plots will include bounding boxes with associated labels as shown below
4. Diagnostic Plots
The last, and perhaps most useful, part of this post is to provide a diagnostic function for the record files. This will basically produce a plot and some text which gives you insight into the contents of the files without looking at each image.
All of this is wrapped up in a single function which is given the full path to the record file;
This function does a few things:
1. Firstly, you will get warnings if any of the bounding boxes are "invalid";
Some or all of the bounding box is outside the image.
The bounding box area is very small
The first of these must be corrected (otherwise you will get tensorflow errors); the second is more of a soft warning; as it might indicate a box which is too small to contain an object and something went wrong when drawing it.
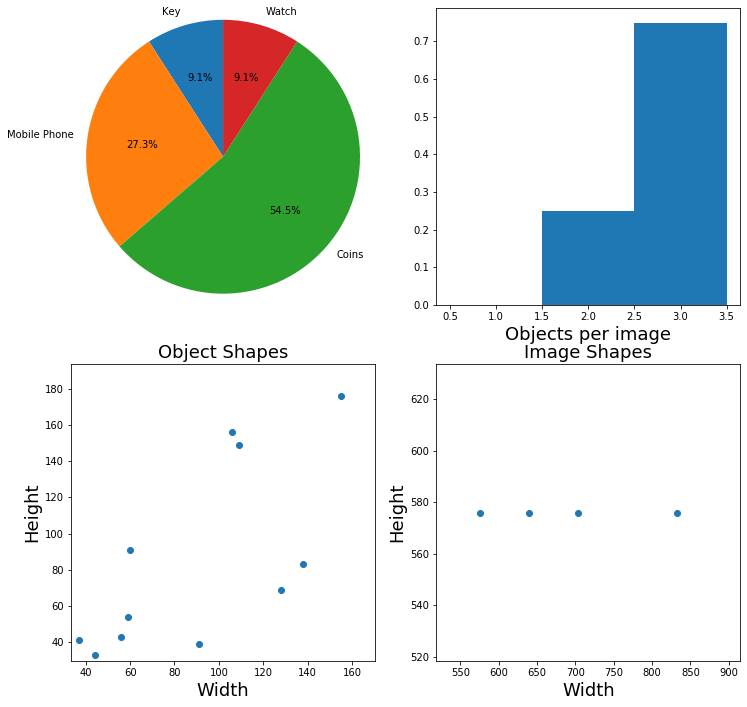
2. Next, there is a 2x2 grid of plots, from top left to bottom right;
The first plot shows the distribution of classes in the record (good for spotting classes which are very under-represented and likely to be difficult for the network to learn).
Next, the distribution of objects in images is shown; so you can see how objects are distributed through the images. You will have an idea of the average objects per image but also will pick up on any anomalous images.
Next, the distribution of image shapes and object shapes is shown. Any negative values indicate a bad box or image and should be fixed to avoid Tensorflow errors. You can also use these distributions to help you tune hyperparameters associated to image resizing and object detection (for example the anchor box sizes and aspect ratios should be chosen to span the object shape distribution as evenly as possible).
An example is shown below;
An example output from the peek_in_record function.
Conclusion & References
That's all for this one. Hopefully this has helped you work with record files in Tensorflow (at worst you should be able to simply copy my code for the bits you need); something which is necessary if you want to quickly develop object detection/classification pipelines.
I wrote all of this code myself, but the Tensorflow object detection API GitHub has an example of a function to create an Example object from which I drew heavily.


Comments